
Reading Your Tires Before They Fail
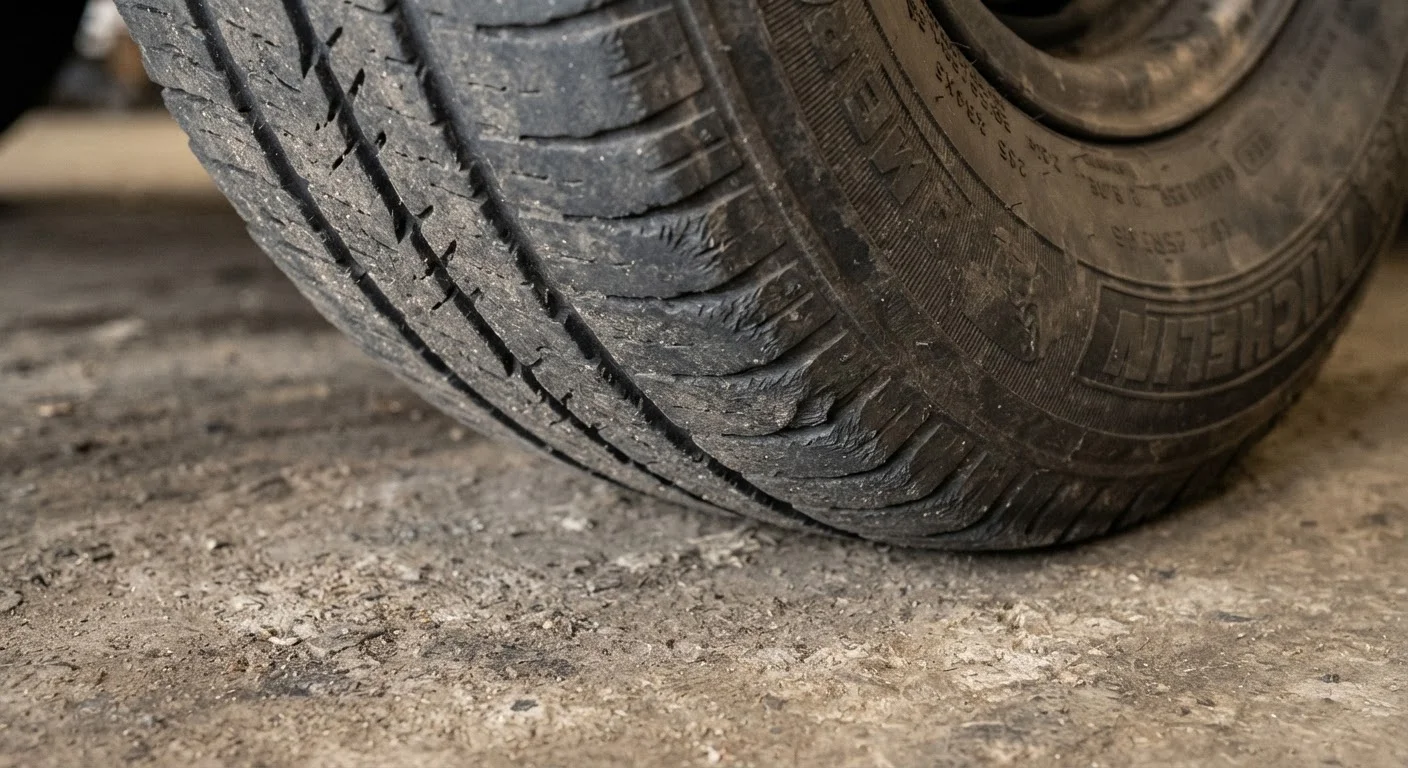
Photo credit: FaqBulletin.com | Information Made Easy
In this article
Tire wear patterns reveal alignment, inflation, and suspension problems. Learn to spot them before a blowout does it for you.
Key Takeaways
- Tire wear patterns reveal specific mechanical problems - each pattern points to a different cause.
- The penny test and quarter test give quick, reliable tread depth readings without special tools.
- Center wear indicates chronic overinflation; edge wear points to underinflation.
- One-sided wear is a classic sign of wheel misalignment requiring professional correction.
- Cupping or scalloping patterns often signal worn shocks or struts, not a tire defect.
- Catching wear patterns early can prevent blowouts and avoid premature full-set replacement.
What Tire Wear Is Actually Telling You
Your tires are in contact with the road every mile you drive, and they absorb the consequences of every mechanical imbalance your vehicle carries. Inflation pressure, wheel alignment, suspension health, and driving habits all leave identifiable marks on the tread surface. Learning to read those marks turns a routine visual check into a diagnostic tool.
The habits that affect road safety most often start here - at the tread itself. When you know what normal wear looks like, anything abnormal becomes obvious fast. This guide walks you through the most common wear patterns, their likely causes, and what action each one calls for.
Build the Habit Into Your Routine
The most effective time to check your tires is every time you fill the gas tank - pressure and a quick visual scan take under two minutes. Catching a developing wear pattern early typically means correcting an alignment or pressure issue rather than replacing a set of tires. Consistent inspection intervals matter more than any single thorough check.
For a broader look at how tires fit into your vehicle's overall maintenance schedule, see our guide on car maintenance from purchase to 100,000 miles.
Tools and What You Need Before You Start
Reading tire wear requires almost nothing beyond your eyes and a coin - but a few additional items make the inspection more precise and complete.
What you will need
Tire pressure gauge
Measures inflation in PSI to confirm whether over- or underinflation is contributing to a wear pattern.
Penny
Used for the penny tread depth test - if Lincoln's head is fully visible, tread is at or below 2/32 inch.
Quarter
Used for an earlier warning threshold - if Washington's head is visible, tread is at or below 4/32 inch.
Flashlight or work light
Illuminates the inner shoulder of the tire, which is difficult to see in ambient light and often shows early alignment wear.
Tread depth gauge
Gives a precise numeric tread depth reading across multiple points of the tire for a more thorough assessment.
How to Inspect Your Tires Step by Step
Run through these steps on a flat surface with the vehicle parked and the engine off. Inspect all four tires individually - patterns often differ between front and rear, and between the driver and passenger sides.
Check tire pressure before inspecting tread
Use your pressure gauge to check all four tires cold - meaning the vehicle has been sitting for at least three hours or driven fewer than one mile. Compare each reading to the recommended PSI on the door jamb sticker, not the number on the tire sidewall (which is the maximum, not the target). Record any readings that are over or under spec, as these directly inform how you'll interpret wear patterns.
Run your hand across the tread surface
With the vehicle stationary, run your open palm firmly across the tread from inside edge to outside edge on each tire. You're feeling for irregularities: raised or sharp edges on one side of tread blocks (feathering), scalloped dips around the circumference (cupping), or a smooth center with grippier edges (center wear). What you feel often confirms what your eyes miss.
Perform the penny and quarter tread depth tests
Insert a penny into the tread groove with Lincoln's head pointing down into the tire. If the top of his head disappears into the groove, you have more than 2/32 inch of tread remaining - the legal minimum in most states. Repeat with a quarter using Washington's head: if his head disappears, you're above 4/32 inch, which is the point many safety experts recommend planning for replacement. Test at multiple points across the width and at several spots around the circumference, since uneven wear means depth varies.
Inspect both the inner and outer shoulders
Crouch down and look at the inner edge of each tire - the side facing toward the center of the vehicle. This edge is the first place camber-related alignment wear appears, and it's routinely missed because it isn't visible during a standing walkthrough. Use a flashlight if needed. Compare inner shoulder wear to outer shoulder wear on the same tire and note any significant difference.
Look for cracking, bulges, and embedded objects
Scan the sidewalls for cracking or dry rot - fine surface cracks that appear with age and UV exposure. Any bulge or bubble on the sidewall indicates internal structural damage and means the tire should not be driven on further. Also check the tread face for embedded nails, screws, or debris. A slow leak from an embedded object is repairable in many cases if caught early; a blowout from ignoring it is not.
Document what you found and determine next steps
Write down your findings for each tire: pressure reading, tread depth at multiple locations, and any abnormal wear pattern or physical damage observed. This record helps you track whether a pattern is new or progressing, and gives a mechanic useful context if you're bringing the vehicle in. Cross-reference your findings with the wear pattern descriptions above to identify likely causes before your service appointment.
Don't Drive on a Tire With a Sidewall Bulge
A bulge in the sidewall means the internal structural cords have failed. The tire can fail suddenly and without warning at highway speeds. If you discover a sidewall bulge during inspection, have the vehicle towed or use your spare - do not drive on it even for a short distance to reach a shop.
Common Wear Patterns and Their Root Causes
Once you've completed your inspection, use the following as a reference guide to interpret what you found:
- Center wear (middle of tread worn faster than edges): Chronic overinflation. An overinflated tire bulges at the center, putting most contact pressure in the middle strip. Correct pressure to the specification on your door jamb sticker - not the maximum listed on the tire sidewall.
- Edge wear (both shoulders worn faster than center): Chronic underinflation. An underinflated tire flexes excessively and contacts the road more at both edges. This pattern also generates excess heat, accelerating structural degradation.
- One-sided wear (inner or outer shoulder only): Wheel misalignment - specifically camber (tilt) or toe (direction) out of spec. This pattern does not resolve on its own and requires an alignment service.
- Cupping or scalloping (scalloped dips around the circumference): Usually indicates worn or failed shock absorbers or struts. The tire bounces rather than rolling smoothly, hitting the pavement unevenly. Replacing tires without addressing the suspension will produce the same pattern again.
- Feathering (tread blocks rounded on one side, sharp on the other): Typically a toe alignment problem. Run your hand across the tread - feathered tires feel noticeably jagged in one direction.
- Flat spots: Can result from emergency braking on non-ABS vehicles, or from a vehicle sitting stationary for an extended period. Mild flat spots sometimes wear away; severe ones compromise ride quality and handling.
If you've been skipping rotations, uneven wear is often the first consequence. Our article on what skipping tire rotations actually costs you explains exactly how that plays out over time.
When to Act and Who Should Do the Work
Not all tire problems are DIY-fixable. Inflation adjustments and visual monitoring are within reach of any driver. Alignment, suspension diagnosis, and tire replacement generally require professional equipment and expertise. Attempting alignment corrections or suspension work without the right tools and knowledge creates safety risk - have a qualified mechanic evaluate those issues.
If tread depth is at or below 2/32 inch (the penny test threshold), the tire should be replaced before driving on it in wet conditions. Traction loss in rain at that depth is significant and measurable. For a complete pre-trip tire review, the pre-road-trip vehicle safety check covers tires alongside every other system worth verifying before a long drive.
Understanding what your tires are showing you is one of the simplest, highest-value maintenance habits available to any driver - no tools required to start, and the information is always there waiting to be read.

Author
Automotive Editorial Team
Automotive Editorial Team is the collective byline for our editorial team and contributor network. Articles published under this byline or an editorial pen name are researched, written, and reviewed according to our editorial standards for clarity, consistency, and independence before publication.
View all articles →